
The orchard by our house consists of six very old, and very big plum trees. When we first came to see this property, before we put an offer on, we tasted one of the plums. It was tasteless and unappealing. So, come winter, we put a wheelbarrow-load of cow manure as well as some fertiliser around the trees, in the hopes that it would improve the flavour.
Come summer this year, the plum trees have been absolutely laden due to the dazzling flowers they put out in spring, and the flavour has definitely improved. The plums are sweet and juicy.

It seems we have four different varieties of plum trees in the orchard. They are well-timed so we’ve had fruit all summer. When the last of the fruit is about to drop on one variety, the first are beginning to ripen on the next.

The trees aren’t small like the manicured ones you’d find in many modern orchards. Instead they’re quite large and probably haven’t seen a pruning saw in years. This makes it difficult to access the higher fruit, but those hanging at head-height have been plenty enough for us. There’s so many that even the birds haven’t been problematic. They peck the fruit randomly, taking only the tiniest sample from each fruit, leaving them on the tree. But when we go picking it’s easy enough to leave those particular fruit and move onto the undamaged ones, which are more plentiful.

While the height of the trees makes a mission out of getting to the majority of the plums, the shade they provide in summer is ideal for sitting under, especially during the heat of the midday sun. Sometimes we’ll eat lunch under these trees and look out over our farm vista. What bliss.

With such a glut of plums on our trees I figured that I really should make an effort to preserve some for the rest of the year. Making plum jam was the first thing on my list to try.
How to make plum jam
I figured the first place to start when making plum jam was to gather some plums, so out to the orchard I went with a small wicker basket in hand. Choosing only the non-bird-pecked plums, I quickly filled my basket. When making jam, however, I only ended up using about a third of these. I didn’t want to make too much, especially since I had no idea how it would turn out.

I washed the plums and removed their stalks, then cut them in half and dug out the pips with my fingers. The recipe I was following called for 1.5kg of plums, but since I’d never made jam before and neither of us are big jam eaters, I thought I’d start with 1kg of plums instead.

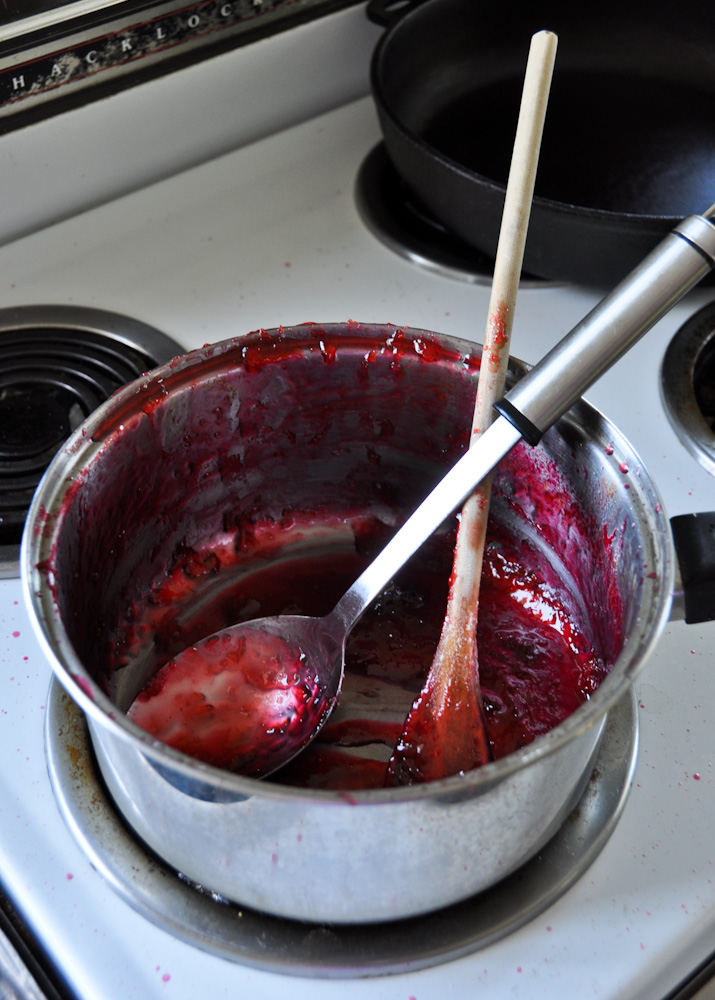
Into a large heavy based pot I put the plums, a small amount of water, and a squeeze of lemon juice. I mashed the plums up a little and then brought them to the boil. I wasn’t sure about leaving the skins of the plums in the jam, but I did and it worked out nicely – they break up and add a nice texture to the jam when it’s ready. Not really noticeable at all.

Turning down the heat I let the plums simmer while I prepared the jars. It’s important to sterilise both the jars and lids, so I washed them with warm soapy water, and then put them in the oven at 120°C on a baking tray to dry out. I wasn’t sure how much jam the recipe would make, so I made sure to wash a few extra jars just in case.

After about 40 minutes of simmering, the plums were really soft. I dumped in 500g of sugar and stirred to dissolve. The recipe I was following called for the same weight of sugar to plums, so technically I should have used 1kg of sugar. However, we prefer a nice tart jam (if a sweeter jam is preferred then it’s easy to add more sugar). I also dropped in a knob of butter which is supposed to help reduce frothing, and brought it to a rapid boil, stirring continuously. I scooped any ‘foam’ that appeared off the top.

After about five minutes the jam should reach it’s setting point. To test this you want to cool a small amount of jam and see if it thickens or if it’s still runny. Have a small plate pre-chilled in the freezer, spread a small teaspoon of jam around on the plate, then run your finger through. If it wrinkles up then it’s ready, if it’s still runny then leave it boiling a bit longer.
Once ready I found it easier to use a big spoon to ladle it into the jars rather than pouring. I made sure to leave enough space at the top of the jars to create the vacuum that will seal them as they cool. I also made sure to get any air bubbles out.
I ended up with two jars of jam plus a bit left over which I popped in the fridge. Within the next couple of days the one in the fridge slowly disappeared as Nick decided it was delicious and ate it by the spoonful.

And he’s right, this jam is delicious, if I do say so myself. The tartness makes it perfect on toast with cream cheese, and the texture is just like what you get in the shop.

The only problem is we’re half way through the first jar already – time to make some more I think!
Plum Jam Recipe
Prep: 15min · Cook: 1hr · Ready in: 1hr 15min · Makes: 2 jars
Ingredients
- 1kg fresh plums
- 500g white sugar for a tart jam, 1kg for a sweet jam, or any amount in between depending on personal preference
- 1 tablespoon lemon juice
- 1 ½ tablespoons butter
- 100ml water
Instructions
- Wash plums and remove stalks.
- Cut the plums in half (vertically), then twist to open and remove the stone.
- Place fruit, lemon juice and water in a large, deep, heavy-based pot and bring to the boil, stirring frequently.
- Reduce heat and simmer until the plums have softened, about 40 mins.
- Keep on low heat and add sugar. Stir continuously until sugar has dissolved.
- Stir in the butter to help reduce frothing. Turn up the heat and stir continuously until the mixture comes to a rapid boil.
- Continue stirring on high heat until the jam reaches setting point. If you don’t have a jam thermometer – this is obvious when the mixture starts to stick/set on the sides of the pan or starts to set when you drop it from your wooden spoon.
- To test, place a teaspoon of jam onto a plate that’s been chilled in the freezer. Allow to cool, then push your finger through the jam, it should start to congeal and wrinkle up – if you can push your finger through and its still runny, you haven’t yet reached setting point. If still not set test again in a few minutes.
- Remove from heat and pour gently into clean, sterilised, warm jars leaving a small gap at the top. Check for air bubbles and remove. Seal and label while jars are warm. Allow to cool completely, then store.


Hey guys I reeeeeally like jam y’know 😉 *nudge*…. Nom!
I have this picture of you Char, wearing a red riding hood and skipping along with your basket of plums. Cuteness!
Beautifully done Char!!! Looks DELISH!!! Chrissie pressies for years to come 🙂