
(UPDATE! Check out this video on how we build a post-and-rail fence.)
Bonkers. That’s one word to describe our goal of erecting a one-hundred-sixty metre long post-and-rail fence. Not because it’s particularly difficult, but because we are perfectionists.
The hundreds of trees we planted to border our prized paddock had for years been protected from the voracious mouths of our animals by a mere hot tape. It was nail-biting whenever the cows were grazing that paddock. For that period, the simple tape line demarcated where we intended to one day erect a handsome post-and-rail fence, replete with the pompousness of a lifestyle block.

About a year ago that time finally came, when we had saved up enough to buy the timber. It was a wound on the bank account, but one we were willing to endure, with the justification that a few touches of beautification here and there can go a long way to rejuvenate a dilapidated old farm. We’re not going nuts with the sexy post-and-rail – just in a couple of places; our orchard and our home paddock near the house, which is where we’re planting most of our trees.

We had already gained confidence through the build of our orchard post-and-rail fence. While that fence had four rails, the one we were yet to build would be easier and cheaper with only three rails and a high-tensile wire between the bottom two to prevent lambs from getting through.
We were well acquainted with the pain of digging each post hole by hand, as we had done for our orchard fence, so this time we forked out for a person with a hydraulic post-driver to bang the hundred-or-so posts into the ground in a few hours. That way we could reserve our stamina for putting the rails on. And because fencing is a two-person job (at least for us), we were restricted to weekends when Char was home. So having these slammed into the ground in a day saved us a crap-ton of time.

It almost brought tears to our eyes watching the posts being punched effortlessly into the ground.

The result was a far straighter and sturdier job than we could have done by hand.

We ummed and ahhed about the space between the rails, mulling over the optimal compromise between aesthetics and function. Once we had our spacers in hand and trailer-o’-tools in tow, we were ready to go!
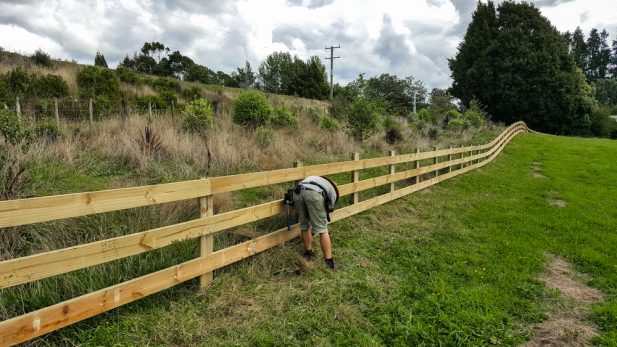
We started at the far end of the fence where it met with the gate to the stock yards. It was a short run of fence at a right angle, so gave us an opportunity to screw up (which we didn’t, by the way, because we are the proverbial bee’s knees).

In short order, following the familiar per-rail routine of measure-measure-cut-measure-support-measure-measure-cut-support-attach, we had our first six-metre section of fence complete, and we were onto the next straight.

We decided to use tornado screws instead of nails to attach the rails this time. We were offered a huge discount because the timber yard had overstocked. Stronger adhesion and less work? Not turning that down. This photo clearly illustrates my preference for the screws:

It was coming together real sweet-like!

When we got up to a tricky bit of the fence where it curved in three dimensions, we began working from the far end, closer to the house.

Unlike the orchard fence where we had tried to follow the contour of the land more closely (a big DON’T in fencing, which we learnt the hard way), this time we kept a smoother continuation by attaching the top rails first.

It was difficult in places where the land sloped suddenly. We had to find a balance between bending the rails but maintaining a smooth appearance over a distance. This required a super-pro technique in places through the use of a ratchet strap, because the rails were too thick (50 x 150mm) to bend with our strength/weight.

We were able to bang out a far distance pretty quick once we got into the rhythm.

Especially with the help of our friend James (below) who turned up for a day to help with holding the rails while we attached them – a very underrated job when you’ve usually only got two sets of hands. (Thanks again, James!)

A few weekends into the project, we had finally reached where the two complete sides were to join – the dreaded curved corner.

We knew from the get-go that this was going to be f-ing troublesome. Not only did the fence curve at that point, the land inclined as well. And to harden a turd, the post-driver dude had made the curve a wee bit too tight for our liking. We had two options, try to bend the rails to the curve, or pull out some of the posts and re-dig them in a less acute way. Of course, we tried the “easier” (read: lazy) and potentially catastrophic option first.

Yep, that’s my bright idea of curving a rail with the quad bike. Needless to say, two rails were snapped. So, we swallowed our pride and painstakingly re-positioned three of the posts.
It was still a tight curve, but at least we could get a ratchet strap around and gently cinch it closed.

It also helped to brace the posts until we had all of the rails attached to support the curve under the immense amount of elasticity, which threatened to push the posts over or pull them right out of the ground.

After a fair amount of wiggling and straining, we got things looking how we wanted, and it thankfully held strong.

You can see here in the next couple of photos how much we had to bend the rails in certain places (especially here on the inclined curve), to account for the lay of the land.
Here’s how a straight rail wants to point:

Here’s how a rail ends up pointing after we’ve beaten it into submission:

Char tended to have the job of measurer/scriber, while I was the cutter/screw-driver, and we were both positioners. In between all that, of course, is a lot of discussion, planning, eye-balling, lip-biting, and maybe even a bit of twerking. Nothing eases frustration like a good twerk.

You can tell we love this kind of work, though. Just look at this face. It’s very rewarding seeing results so quickly.

Once we’d joined the two runs of fence with the curve, our fence was, for the most part, complete!


Now all that was left was to trim off the tops of the posts for a tidy look, and to string up the high-tensile wire between the bottom two rails. We started with the wire, since then we could finally let our sheep into that paddock to graze.
We were a little nervous about this part, since we hadn’t tensioned wire in this way before. We ran the wire along the whole length and used staple nails to keep it flush against each rail. We started by teaching ourselves how to tie a fencing knot.

Not bad, eh? Especially when you compare it to the quality of the knots around the rest of the farm, from generations ago… Ahem.

The part of the fence that had a right angle required the use of a little technique we’d seen to protect the corner of wood:

We tied the joining ends of the wires to an “in-line strainer”, which is a useful little ratcheting device for retaining tension. You crank it until you have the optimal tension in your wire, and it just stays there, ready to be tightened if ever the wire goes slack.

The final step which marked the completion of the daunting project was to trim off the post tops, which we later treated to prevent decay.


Here are some photos of the finished product, which we now enjoy whenever we venture out onto the farm. What a difference it makes!

It’ll really pop once the bush behind it grows up. That’ll be flippin’ gorg’.

Just look at that sexy curve above. Look harder. You’re not looking hard enough. Don’t you know how difficult that was?! Here, ogle it from another angle:

Here’s the roadside length glorified under a rising full moon:

Here’s a panorama of the entire one-hundred-sixty metre length:

Now just to get around to finishing our orchard fences… Oh, and the new stockyard fences. Oh, and the fences around the farm that are in a perpetual state of disrepair. Oh, and our home yard fence. Oh, and the new roadside fence. And… the list is endless.
If you’re going to have a farm, you’d better enjoy fencing. Good thing we do.
(UPDATE! Check out this video on how we build a post-and-rail fence.)


Looks great! After putting up only 50yds of fencing I do not envy you guys. You guys should be proud of yourselves. It looks like it will be standing for many decades to come.
Thanks, Nate! It took much less time than expected with the help of that post-driver, that’s for sure.
Just discovered this post!!! Absolutely amazing and what a terrific job guys!!! As I’ve said before – whatever project you embark on – you finish it (a huge undertaking on this one). And you always complete it to PERFECTION! Amazing curvature – what on earth made you do that tight curve… but doesn’t it look so graceful and so neat – it really, really enhances the landscape and draw your eye to the gloriousness of your beautiful land. Plus most importantly keeps those critters away (cept the hares!!!)
I’ve been planning to get back to your wondrous blog for many months, but the vicissitudes of life have consistently frustrated my best intentions. How happy I am, however, that my “pathological persistence” has finally won the day! I can’t possibly express in mere words how incredibly impressed I am with the elegant artistry of the labors of love that you and Char have wrought here, Nick. Of all of the great many wooden fences that I have admired in my extensive journeys through rural America, none of them have even come close to the high standards you’ve achieved here. You two have to be the most artistic of all farmers in all of New Zealand–if not in the world!!!
My psychologist mentality persuades me strongly that the massive dopamine rush that I’ve received in reviewing this latest blog post will definitely entice me to visit your blog again VERY SOON for another powerful hit. Bravo, Bravo, Bravo, my inspiring down-under friends.!!! I hereby nominate you for the Farmers of the Year award. I’m very certain that Mother Earth is in full agreement with this nomination. May you continue to bask in the unmatched, deep satisfaction of your loving labors and may many others be inspired to follow in your devoted footsteps in preserving and beautifying our beautiful-but-beleaguered blue planet. 🙂
Hey mate do you know the height an gaps between the timber you used ? Looks amazing
Hi Matt, the spacing is 210mm between the rails.
Hello! What size posts and rails did you use? And how far between the posts? Yours looks great and I want to copy!! : ) thanks
Hi Kelsi! I think we use number 2 half rounds (but could be no. 1, just slipping my mind at the moment!), 50 x 150mm rails (but we got a good deal on these, sometimes we use 40 x 150mm which are perfectly adequate), spacing between posts is just under 2m (for 6m rails), spacing between rails is 210mm. Good luck on your build!
Just checked, we use 1.8m No.1 half rounds 🙂
Im so jealous you’ve done an amazing job. sexy curves alright